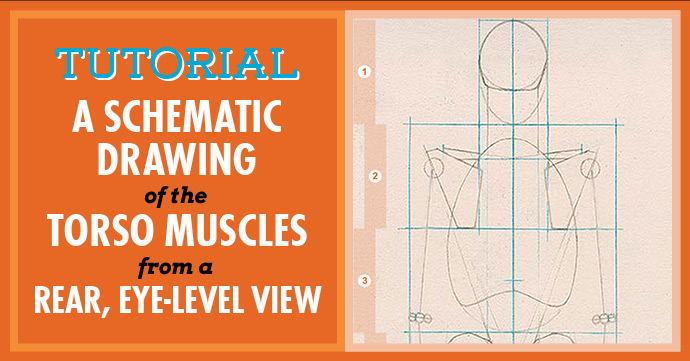
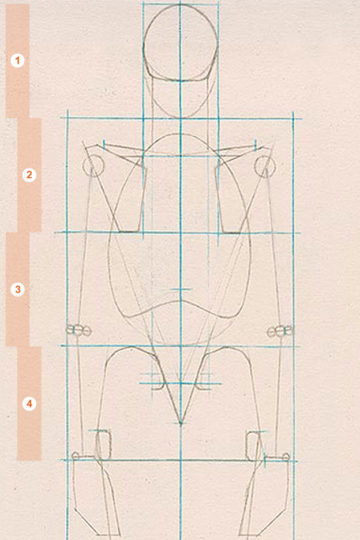
In this tutorial, we’ll draw the schematic shapes of the muscles of the back (including the pelvic region). To do this, you’ll need your drawing of the framework of the body as seen from the rear, which you completed in Tutorial 07 (fig. 1, below).
Remember that a schematic drawing is a simplification of a much more complex subject, often using straight lines or geometric shapes. For this drawing of the muscles of the back, I’ve chosen not to include some of the smaller muscles , specifically those that lie over and attach to the shoulder blades (even more specifically: the teres major, teres minor, infraspinatus, and the rhomboids). Although these muscles are evident on the surface of the body and important to artists, they over-complicate a simple schematic drawing. In a more detailed drawing, these muscles will fit neatly into the schematic drawing, in the space over the shoulder blades and below the deltoids.
We’ll build the shapes of the muscles from the top down. The muscles of the back overlap one another frequently, however, so it’s important to understand where this happens in a schematic drawing, which might not clearly indicate such three-dimensional relationships. As we go through this tutorial, I’ll point out where certain muscles overlap other muscles.
There are 8 steps in this tutorial, so let’s get started.
Step 1: The Trapezius
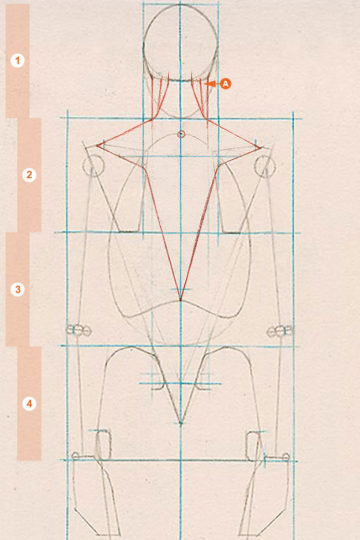
Draw the trapezius by starting at the base of the cranium (fig. 1, A) with steep, outward sloping lines on each side, which cross the outsides of the neck at the bottom of the first head unit.
To the outside of the neck, the trapezius forms the edges of the shoulder lines (B). The shoulder lines connect to
the outside of the collar bones, about 2/3 of a head length to each side of the core axis, and have approximately the same angles as a wire coat hanger (see Tutorial 04 on drawing the muscles of the torso from the front view).
The trapezius then angles sharply inward along the spine of each scapula or shoulder blade (C). At the inner edge of each spine (in line with the outsides of the head), the trapezius turns again and drops steeply toward the spinal column, which is in line with the core axis. The edges of the trapezius come together at the bottom of the rib cage, about 2/3 of the way down the third head unit (D).
The protuberance that is formed by the seventh cervical vertebrae is located on the core axis at the top of the rib cage (E).
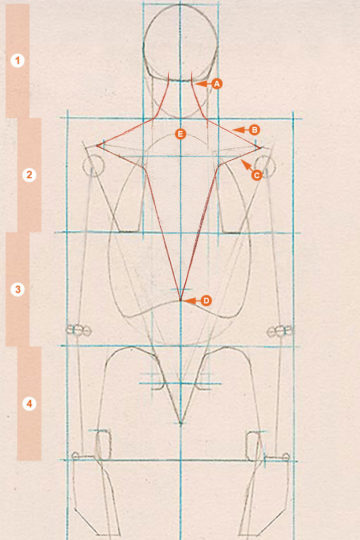
Fig. 2. The trapezius has the shape of a four-pointed star running from the back of the cranium to the bottom of the rib cage, attaching to the spines of the shoulder blades, and forming the contours of the shoulder lines.
Step 2: The Sternomastoids
The sternomastoid muscles form the outer contours of the neck from a rear view (fig. 2, A). Draw the outside edges of these muscles directly over the vertical lines of the neck that you may already have in your drawing, about 1/4 of a head length to each side of the core axis.
The inner edges of the sternomastoids lie about halfway
between the outsides of the neck and the edges of the trapezius. These lines angle very slightly outward as they descend.
Step 3: The Deltoids
Draw the shoulder muscles or deltoids beginning at the acromion process to the outside of each collar bone (fig. 3, A). The contour of each deltoid steepens to around a 45-degree angle to the outside of the acromion process, then steepens again and descends toward the widest point of the deltoid, about 3/4 of the way down the second head unit.
The deltoid then curves inward, intersecting the axis of the upper arm at the bottom of the second head unit (B). From this point, the bottom edge of each deltoid angles upward the inner point of the spine of the
scapula (C). Notice that this point is in line with the outsides of the head, at the location where the trapezius drops sharply toward the spinal column. Notice also that this lower edge of each deltoid is around a 45 degree angle, and is much flatter than the lower edge of each deltoid on the front of the torso.
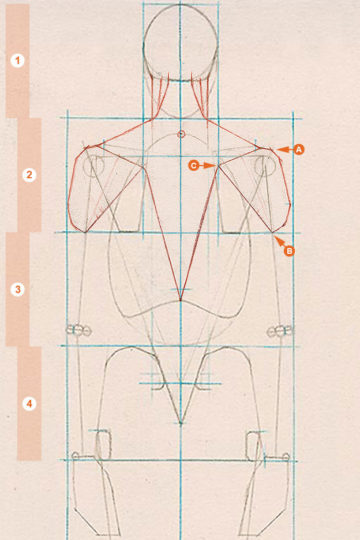
Fig. 4. On the back of the body, the deltoids attach to the underside of the spines of the shoulder blades, and angle outwards about 45 degrees toward the arms.
Step 4: The Lower Edges of the Latissimus Dorsi
Draw the lower edges of the latissimus dorsi muscle on each side of the figure, beginning at the bottom of the deltoids and just to the outsides of the rib cage (fig. 2). These contours taper in toward the ribs and follow the curve of the rib cage toward its bottom.
The edges of the latissimus dorsi connect to the upper edges of each hip bone, just outside the upper points of the sacral triangle (A). The latissimus then stair-steps around the tops of the hip bones, and descend along the inner edges of the sacrum, intersecting on the core axis about 2/3 of the way down the fourth head unit (B).
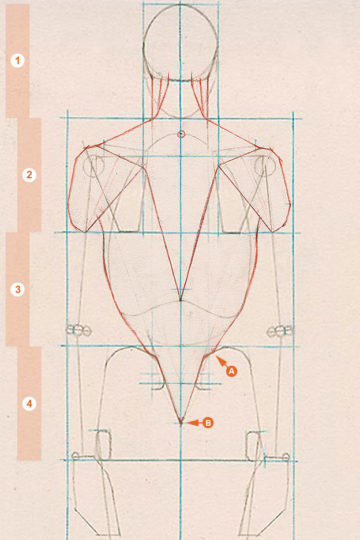
Fig. 5. The outer edges of the latissimus dorsi taper down from beneath the deltoids and connect to the inner ridges of the hip bones.
Step 5: The Upper Edges of the Latissimus Dorsi
The upper edges of the latissimus dorsi lie just above the bottom of the second head unit, and overlap the bottoms of each scapula (fig. 6, A). Draw the upper edges of the lats as slightly curving lines between the trapezius and the deltoids. Note that the latissimus passes underneath both of these muscles. Notice also that the upper edges of the latissimus and the outside contours appear to come together right at the lower edge of each deltoid.
The upper edges of the lats are visually similar to the lower edges of the pectoral muscles on the front of the torso, though the edges of the latissimus are slightly higher on the body.
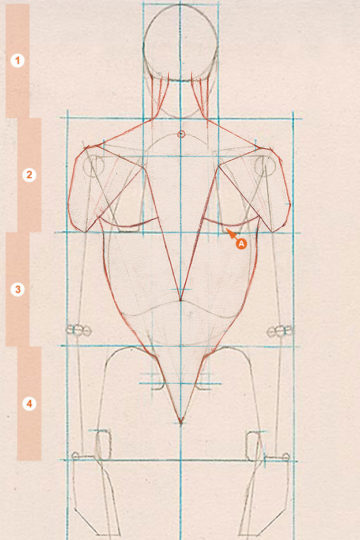
Fig. 6. The upper edges of the latissimus dorsi overlap the bottoms of the shoulder blades but pass beneath the trapezius and the deltoids.
Step 6: The Obliques
From a rear view, the oblique muscles are not as visible as they are in the front view of the figure, but the part that is visible (the flank pad; fig. 7, A) has the same shape.
Draw the obliques with slightly flowing lines that descend from the bottoms of the rib cage. The narrowest point between the obliques marks the level of the waist, and should lie between the bottom of the ribs and the top of the hip bones. The obliques curve outward from the waist to connect to the outsides of the hip bones, just below the top of the fourth head unit.
When drawing a heavier figure, the obliques may curve outward to a greater degree in their lower region. This is because fat deposits accumulate on the obliques, particularly in men.
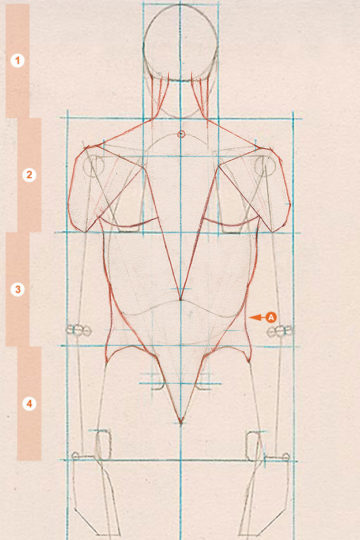
Fig. 7. From a rear view, the outer edges of the oblique muscles appear much the same as they do in a front view, connecting the lower rib cage to the hips.
Step 7: The Gluteus Medius
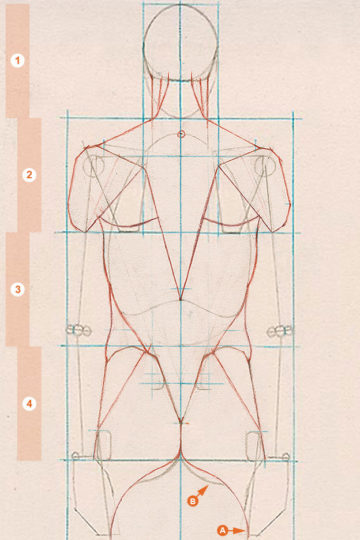
The back of the pelvic region is defined by two muscles, the gluteus medius (to the outside) and the gluteus maximus (on the inside; fig. 8). Draw the edges between these muscles with diagonal lines descending from the top of each hip bone, at the same point that the latissimus dorsi connects to the hips (A). The edge between the gluteal muscles points toward the outside of the pelvic region at the tops of the greater trochanters (B).
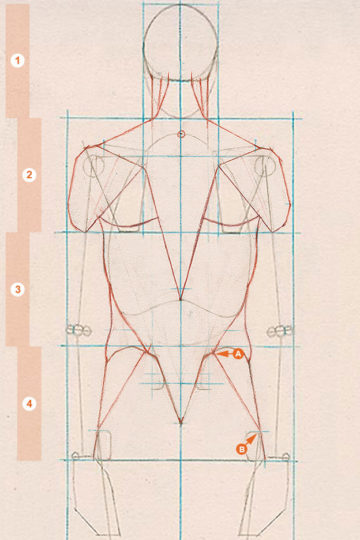
Fig. 8. The gluteus medius muscles lie beneath the hip bones and wrap around the sides of the figure, with the bottom edges angling outward as they descend.
Step 8: The Gluteus Maximus
The inner edges of the gluteus maximus muscle on each side of the body attach to the inner edges of the hip bones (fig. 9). From where the gluteus maximus muscles come together (at the bottom of the sacral triangle), they descend vertically to form the cleft of the buttocks. At around the bottom of the fourth head unit, these edges curve outward from each other in a graceful S curve toward the axis of the upper leg (A).
The lower part of the gluteus maximus is a repository for fat, even in slender people. To create the more typical curves of the buttocks, you may wish to add (or simply draw from the start) a more sagging line at the bottom of each gluteus maximus (B).

Leave a Reply